Ads 468x60px

Google Drive Essential features to know

Google Drive is Google's challenge to Dropbox--a file storage system linked to your Google account and accessible via the Internet, so you can access your files from almost any device on-the-go. Drive is currently available for Microsoft Windows, Mac OS X, iOS and Android. Users are given 5 gigabytes (5GB) of free cloud storage to start; additional storage can be purchased for a small fee. Read this article to learn how to get started using Google Drive.


  1. Sign into Google Drive with your Google account at http://drive.google.com. If you're a Gmail user, you can use your Gmail account to sign in. There's a red sign-up button on the top right-hand corner of the login page if you don't have a Google account.
  2.  Once you've launched Google Drive in your web browser, you will be taken to a page that shows all of the Google Documents you currently have associated with your Google account. A tab will pop up asking if you would like to download Google Drive for PC or Mac--whichever system you are currently on. Do so if you'd like to access your documents from more than your web browser. However, you don't have to use this option.
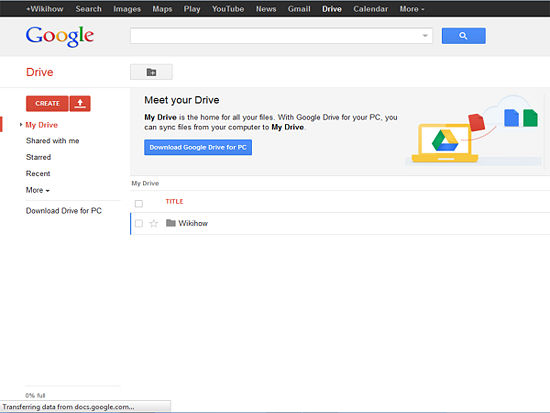


  • Create a new file by clicking on Create on the left-hand-side of your screen. This is an extension of Google Docs.

Create a new folder by clicking on the gray folder icon above your list of Google Drive files. (It's diagonal from the "Create" button.)
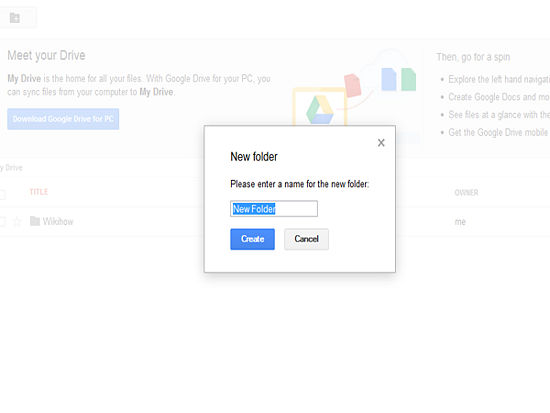
  • Upload files from your computer by clicking on the Upload icon (located to the right of the "Create" button). This will upload file(s) and/or folder(s) to Google's servers and will enable you to share them with anyone you choose. Alternatively, you can choose to keep some or all files private; to use this option, you don't need to do anything other than create the document, since sharing is something you must activate for each file.


  • Using the navigation bar on the left, you can view the files that people have shared with you, the files that have been starred by you, recent files and more options.

    • The files that you have already uploaded to Google servers can be viewed in the center of the screen. The screen will show you many details, including its owner, its last modification, whether it has been shared with others, and file titles.

    • When you check the box next to files, a menu will pop up allowing you to share, organize, delete, mark as (un)viewed, download, etc., for the selected files. This is where you can add a file to a folder, by clicking on the square box next to the relevant file, then clicking on the folder icon in the menu. A drop-down menu will appear of all your folders, and you can check the relevant folder.

    • Clicking on the star next to a file will quickly allow you to star it––it will turn from clear to yellow. The benefit of stars is that the starred folders can all be viewed at once by clicking on the "Starred" heading in the navigation bar of Google Drive, hiding all unstarred files. This can be very useful if you have a single project holding various documents that you'd like to find quickly and all together.

    • The navigation bar also allows you to see your files by "Activity", which brings the most recently edited files to the top of the list, whether worked on by you or by people you're sharing with.

    • To see all of your files and folders, click on "My Drive". This can be fairly daunting to search through if you have lots though! It's a good idea to place related files into folders as you go, to make searching easier.

      1. 4
        On the right side, there's a horizontal menu bar at the top that will allow you to adjust your Google Drive settings. Many of them are accessible via the button with the wrench icon.

        • You can click "Sort" to change how your files are sorted (by title, last modified, last edited by me, last opened by me, etc.).

        • You can switch between "List" mode--where files are listed by name and information -- and "Grid" mode--where files are organized by thumbnail screenshots.

      2. 5
        You've now walked through the basics of how to use Google Drive. For help and/or more information, you can check out the Google Drive help page at https://support.google.com/drive/.


      Using Google Drive from a computer

      1. 1
        Open Google Drive on your web browser at http://drive.google.com. On the left-hand menu, click on the last link, "Download Google Drive."

      2. 2
        Once you have installed Google Drive for PC or Mac, you will be presented with a short walkthrough of Google Drive's features.

      3. 3
        On the second screen, you have the option to alter your sync settings by clicking on "Advanced Setup."

        • Pay attention to the location of your Google Drive folder. Everything placed in that folder will be synced to your Google account on the cloud, so that they can be accessible on other Drive-supported devices. If you'd like to change the location of this folder, press "Change...".

        • If you only want to sync certain folders to your Google account, select those in the "Sync options" box. You will be able to change these later as you create new folders. Note that files not in a folder will always sync.

      4. 4
        Open your Google Drive folder. You can do this by going to Start >> All Programs >> Google Drive, or finding the location of your Google Drive folder and double-clicking it.

      5. 5
        To upload any file to Google Drive, just copy the file and paste it into the Google Drive folder.

        • Google Drive will automatically sync the file to Google's servers, so you can access that file from any Internet-enabled device logged into your Google account.

        • If there is a tick mark in the icon of the folder or the file that you are uploading, it means that the file has been successfully uploaded. If not, either the file is still getting uploaded or the upload failed.


      Using Google Drive on Android

      Google Drive for Android Operating System (OS) was officially launched on April 24th, 2012. Google Drive for Android replaces Google Docs.

      1. Download the Drive by going to Google Play Store on your Android device.

        • Alternatively, you can go to https://play.google.com and download the same.

        • Google Drive runs on devices which have Android 2.1 or higher.


      2. The main screen of Google Drive provides options for navigating within the service. You will have access to files in your Drive, documents that have been shared with you, files or folders you have starred, recently opened, or edited, as well as files you have downloaded for offline access.


      3. Tap on the account name (on the top of the screen) to switch between Google Accounts and respective Drive accounts.


      4. Create a new item or file by tapping on Menu icon and clicking on 'New'.

        • The first three options in the menu are similar to the ones that were available in Google Docs.

        • The 'Upload' is new to Google Drive and was not available on Google Docs.

      5. Use 'Settings' screen to set the cache size, enable/ disable encryption of offline documents, and various other features.

        • The Cache size can be set from 50MB to 250MB depending on your usage.


      6. Favourite any file or item by clicking on the star to the left side of the title.

        • Starring items will give you easy access to them whenever you use Google Drive.


      7. Click on the small arrow icon on the right-hand side of the title for offline viewing, sharing, sending, renaming, deleting, and opening with another application.


      8. Use the Search feature to search for a particular file, document or folder that you have uploaded or others have shared with you.

      9. You can also use Google drive offline, if you download the Google drive app from the Chrome web store.

    Disabling the Search Indexing Feature in Windows 7


    o  Right Click the “Computer” Icon in the desktop and select “Manage”. 
    o  Click “Services and Applications” in the “Computer Management” window. 
    o  Click on “Services”. 
    o  You can see a lot of services listed there. Look for “Windows Search” in that.  
    o  Right Click on “Windows Search” from the list and choose “Properties”. 
    o  The “Windows Search Properties Window” will open up. From “Startup type” click 
    on the drop down menu and choose “Disabled”. 
    o  Click “Apply” then “OK” and that’s it. The Windows 7 Search Indexing Feature is 
    now disabled. 
    If you want to completely disable the search indexing feature in Windows 7 you can 
    set the Search Indexing Service to Manual.


    Network Devices

    Repeaters, Bridges, Routers, and Gateways

    Network Repeater

    A repeater connects two segments of your network cable. It retimes and regenerates the signals to proper amplitudes and sends them to the other segments. When talking about, ethernet topology, you are probably talking about using a hub as a repeater. Repeaters require a small amount of time to regenerate the signal. This can cause a propagation delay which can affect network communication when there are several repeaters in a row. Many network architectures limit the number of repeaters that can be used in a row. Repeaters work only at the physical layer of the OSI network model.


    Bridge

    A bridge reads the outermost section of data on the data packet, to tell where the message is going. It reduces the traffic on other network segments, since it does not send all packets. Bridges can be programmed to reject packets from particular networks. Bridging occurs at the data link layer of the OSI model, which means the bridge cannot read IP addresses, but only the outermost hardware address of the packet. In our case the bridge can read the ethernet data which gives the hardware address of the destination address, not the IP address. Bridges forward all broadcast messages. Only a special bridge called a translation bridge will allow two networks of different architectures to be connected. Bridges do not normally allow connection of networks with different architectures. The hardware address is also called the MAC (media access control) address. To determine the network segment a MAC address belongs to, bridges use one of:
    • Transparent Bridging - They build a table of addresses (bridging table) as they receive packets. If the address is not in the bridging table, the packet is forwarded to all segments other than the one it came from. This type of bridge is used on ethernet networks.
    • Source route bridging - The source computer provides path information inside the packet. This is used on Token Ring networks.

     
    Network Router

    A router is used to route data packets between two networks. It reads the information in each packet to tell where it is going. If it is destined for an immediate network it has access to, it will strip the outer packet, readdress the packet to the proper ethernet address, and transmit it on that network. If it is destined for another network and must be sent to another router, it will re-package the outer packet to be received by the next router and send it to the next router. The section on routing explains the theory behind this and how routing tables are used to help determine packet destinations. Routing occurs at the network layer of the OSI model. They can connect networks with different architectures such as Token Ring and Ethernet. Although they can transform information at the data link level, routers cannot transform information from one data format such as TCP/IP to another such as IPX/SPX. Routers do not send broadcast packets or corrupted packets. If the routing table does not indicate the proper address of a packet, the packet is discarded.


    Brouter

    There is a device called a brouter which will function similar to a bridge for network transport protocols that are not routable, and will function as a router for routable protocols. It functions at the network and data link layers of the OSI network model.

    Gateway

    A gateway can translate information between different network data formats or network architectures. It can translate TCP/IP to AppleTalk so computers supporting TCP/IP can communicate with Apple brand computers. Most gateways operate at the application layer, but can operate at the network or session layer of the OSI model. Gateways will start at the lower level and strip information until it gets to the required level and repackage the information and work its way back toward the hardware layer of the OSI model. To confuse issues, when talking about a router that is used to interface to another network,the word gateway is often used. This does not mean the routing machine is a gateway as defined here, although it could be.


    Network Topology

    A network consists of multiple computers connected using some type of interface, each having one or more interface devices such as a Network Interface Card (NIC) and/or a serial device for PPP networking. Each computer is supported by network software that provides the server or client functionality. The hardware used to transmit data across the network is called the media. It may include copper cable, fiber optic, or wireless transmission. The standard cabling used for the purposes of this document is 10Base-T category 5 ethernet cable. This is twisted copper cabling which appears at the surface to look similar to TV coaxial cable. It is terminated on each end by a connector that looks much like a phone connector. Its maximum segment length is 100 meters.
     

    Network Categories
     
    There are two main types of network categories which are:
    • Server based
    • Peer-to-peer
    In a server based network, there are computers set up to be primary providers of services such as file service or mail service. The computers providing the service are are called servers and the computers that request and use
    the service are called client computers.
                      In a peer-to-peer network, various computers on the network can act both as clients and servers. For instance, many Microsoft Windows based computers will allow file and print sharing. These computers can act both as a
    client and a server and are also referred to as peers. Many networks are combination peer-to-peer and server based networks. The network operating system uses a network data protocol to communicate on the network to
    other computers. The network operating system supports the applications on that computer. A Network Operating System (NOS) includes Windows NT, Novell Netware, Linux, Unix and others.
    Three Network Topologies The network topology describes the method used to do the physical wiring of the network. 
    The main ones are bus, star, and ring.

    Bus Topology

    Bus - Both ends of the network must be terminated with a terminator. A barrel connector can be used to
    extend it.

    Ring Topology


    Ring - Devices are connected from one to another, as in a ring. A data token is used to grant permission for
    each computer to communicate.

    Star Topology 


    Star - All devices revolve around a central hub, which is what controls the network communications, and can communicate with other hubs. Range limits are about 100 meters from the hub.

    There are also hybrid networks including a star-bus hybrid, star-ring network, and mesh networks with connections between various computers on the network. Mesh networks ideally allow each computer to have a direct connection to each of the other computers. The topology this documentation deals with most is star topology since that is what ethernet networks use.

    Make your name stay on taskmanager


    "Right now, I will show you something very simple, and cool.
    I will show you how to make your name stay in the task bar (right next to the digital time)." ps


    1. Open Start Menu and then open Control Panel
    2. Double click Regional and Language Options
    3. Click Customize (You have to chose English or it will not work)
    4. Go to Time tab and change AM/PM symbols to the name of your choice!

    Rename your RecycleBin to any other Name as you Like


    1. Click Start / Run
    2. Type regedit and press enter.
    3. Open the HKEY_CLASSES_ROOT folder
    4. Open the CLSID folder
    5. Open the {645FF040-5081-101B-9F08-00AA002F954E} folder
    6. Open the ShellFolder folder
     

    7. Change the "Attributes" data value from "40 01 00 20" to "50 01 00 20". Once
    completed change the "CallForAttributes" dword value to "0x00000000" (double-
    click and change value data to 0). You must change both of these values to get the
    rename to appear.


    After performing the above steps you will be able to rename the icon like any other
    icon. Right-click the Recycle Bin icon on the desktop and click Rename and rename it
    to whatever you wish.

    Folder Lock without any software; using just a .bat file


    "Paste the code given below in notepad ,enter the password that you need in the red marked position and 'Save' it as batch file (with extension '.bat').Any name will do.
    Then you see a batch file. Double click on this batch file to create a folder locker.
    New folder named 'Locker' would be formed at the same location.
    Now bring all the files you want to hide in the 'Locker' folder. Double click on the batch file to lock the folder namely 'Locker'.
    If you want to unlock your files,double click the batch file again and you would be prompted for password.   
    by   p$"
    Enter the password and enjoy access to the folder.

    cls
    :End
    @ECHO OFF
    title Folder Locker

    if EXIST "Control Panel.{21EC2020-3AEA-1069-A2DD-08002B30309D}" goto UNLOCK
    if NOT EXIST Locker goto MDLOCKER
    :CONFIRM
    echo Are you sure u want to Lock the folder(Y/N)
    set/p "cho=>"
    if %cho%==REPLACEWITHPASSWORD goto LOCK
    if %cho%==y goto LOCK
    if %cho%==n goto END
    if %cho%==N goto END
    echo Invalid choice.
    goto CONFIRM
    :LOCK
    ren Locker "Control Panel.{21EC2020-3AEA-1069-A2DD-08002B30309D}"
    attrib +h +s "Control Panel.{21EC2020-3AEA-1069-A2DD-08002B30309D}"
    echo Folder locked
    goto End
    :UNLOCK
    echo Enter password to Unlock folder
    set/p "pass=>"
    if NOT %pass%==type your password here goto FAIL
    attrib -h -s "Control Panel.{21EC2020-3AEA-1069-A2DD-08002B30309D}"
    ren "Control Panel.{21EC2020-3AEA-1069-A2DD-08002B30309D}" Locker
    echo Folder Unlocked successfully
    goto End
    :FAIL


    How to make your computer faster

    " This tutorial will teach you how to increase your operating system speed 3 times faster.this steps should be applied by either slow and fast computers. it will speed up your operating system surfing. there are 28 easy steps. it might take a bit long to apply them all especially if you're not familiar with windows registry, but trust me.. Am an Engineer..." ps


    Ok now here it goes...read carefully... bcoz i wont accept any questions about it...


    1.. Visual effects should be set to a minimum.
    Start > Settings > Control Panel > System > Advanced > Performance
    Settings > Visual Effects Tab > Adjust for best performance


    2. Switch Off Desktop Background Image
    Right Click Desktop > Properties > Desktop Tab > Background None

    3. Disable Screen Saver
    Right Click Desktop > Properties > Screen Saver > None


    5. Disable Fast User Switching
    Start > Settings > Control Panel > User Accounts > Change the way
    users log on or off > Untick Use Fast User Switching

    6. Switch Off Power Schemes
    Start > Settings > Control Panel > Power Options > Always On > Turn
    off monitor and turn off hard discs to Never

    7. Switch Off Hibernation
    Start > Settings > Control Panel > Power Options > Hibernate > Untick
    Hibernation

    8. Activate DMA on Hard Discs/CD ROMS
    Start > Settings > Control Panel > System > Hardware > Device Manager
    > IDE ATA/ATAPI Controllers > Right Click Primary IDE channel and
    Secondary IDE channel > Properties > Advanced Settings Tab > Tra

    9. Disable System Sounds
    Start > Settings > Control Panel > Sounds and Audio Devices > Sounds
    Tab > Sound Scheme to None.

    10. Do Not Map Through Soundcard
    Start > Settings > Control Panel > Sounds and Audio Devices > Hardware
    Tab > (highlight your soundcard from the list) > Properties > Audio
    Devices > (highlight your soundcard from the list) > Properti
     

    11. Disable System Restore
    Start > Settings > Control Panel> System > System Restore Tab. Tick
    the "Turn off System Restore on all Drives"

    12. Disable Automatic Updates
    Start > Settings > Control Panel> System > Automatic Updates > Turn
    off automatic updating. I want to update my computer manually

    13. Startup and Recovery Options
    Start > Settings > Control Panel> System > Advanced > Startup and
    Recovery Settings > Untick Automatically Restart
     
     14. Disable Error Reporting
    Start > Settings > Control Panel> System > Advanced > Error Reporting
    > Disable Error Reporting

    15. Disable Remote Assistance
    Start > Settings > Control Panel> System > Remote > Untick Allow
    remote assistance invitations to be sent from this computer

    16. Fix Swap File (Virtual Memory)
    Start > Settings > Control Panel > System > Advanced > Performance
    Settings > Advanced > Virtual Memory Change > Custom Size. Set initial
    and maximum size to the same value

    17. Speed Up Menus
    Start > Run > Regedit > HKEY_CURRENT_ USER > Control Panel > Desktop
    Folder. Set MenuShowDelay to 1

    18. Disable Offline Files
    Start > Settings > Control Panel > Folder Options > Offline Files
    Untick "Enable Offline Files"

    19. Disable Remote Desktop
    Start > Settings > Control Panel > System > Remote > Untick "Allow
    users to connect remotely to this computer"

    20. Disable Internet Synchronise Time
    Start > Settings > Control Panel > Date and Time > Internet Time >
    Untick "Automatically synchronize with internet time server"

    21. Disable Hide Inactive Icons
    Start > Settings > Taskbar and Start Menu > Taskbar TAB > Uncheck
    "Hide Inactive Icons"
      
    22. Disable Automatic Desktop Cleanup Wizard
    Start > Settings > Control Panel > Display > Desktop > Customise
    Desktop > Untick "Run Desktop Cleanup Wizard every 60 days"

    23. Disable NTFS Last Access Time Logging (NTFS File Systems Only)
    Start > Run > regedit > HKEY_LOCAL_MACHINE > System >
    CurrentControlSet > Control > Filesystem. Add a new DWORD value -
    "NtfsDisableLastAcc essUpdate" and set value to 1.

    24. Disable Notification Area Balloon Tips
    Start > Run > regedit > HKEY_CURRENT_ USER > Software > Microsoft >
    Windows > CurrentVersion > Explorer > Advanced. Create a new DWORD
    value called EnableBalloonTips and set to 0.

    25. Disable CDROM Autoplay
    Start > Run > regedit > HKEY_LOCAL_MACHINE > System >
    CurrentControlSet > Services > Cdrom. Set autorun to 0.

    26. Disable Disc Indexing Service
    Right Click Start > Explorer > Right Click Each Disc > Properties >
    Untick "Allow Indexing Service to index this disc for fast file
    searching"


    27.Restart ur pc...enjoy!! !

    Comments

    Enter Your Comments Here...
    Related Posts Plugin for WordPress, Blogger...

    You Are Here...

    Search

    Like Us On Facebook