Ads 468x60px

Showing posts with label Softwares. Show all posts

Google Drive Essential features to know

Google Drive is Google's challenge to Dropbox--a file storage system linked to your Google account and accessible via the Internet, so you can access your files from almost any device on-the-go. Drive is currently available for Microsoft Windows, Mac OS X, iOS and Android. Users are given 5 gigabytes (5GB) of free cloud storage to start; additional storage can be purchased for a small fee. Read this article to learn how to get started using Google Drive.


  1. Sign into Google Drive with your Google account at http://drive.google.com. If you're a Gmail user, you can use your Gmail account to sign in. There's a red sign-up button on the top right-hand corner of the login page if you don't have a Google account.
  2.  Once you've launched Google Drive in your web browser, you will be taken to a page that shows all of the Google Documents you currently have associated with your Google account. A tab will pop up asking if you would like to download Google Drive for PC or Mac--whichever system you are currently on. Do so if you'd like to access your documents from more than your web browser. However, you don't have to use this option.
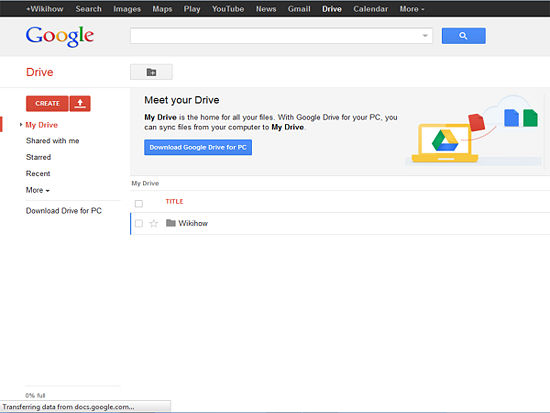


  • Create a new file by clicking on Create on the left-hand-side of your screen. This is an extension of Google Docs.

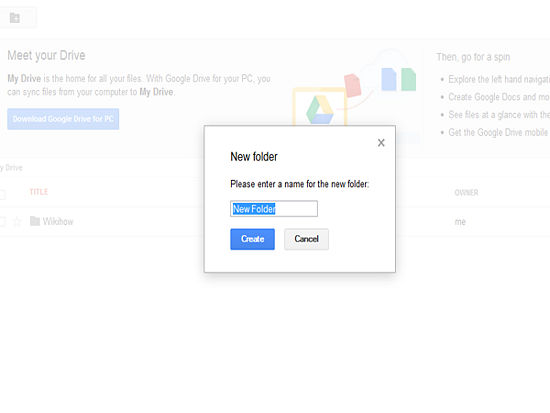
Create a new folder by clicking on the gray folder icon above your list of Google Drive files. (It's diagonal from the "Create" button.)
  • Upload files from your computer by clicking on the Upload icon (located to the right of the "Create" button). This will upload file(s) and/or folder(s) to Google's servers and will enable you to share them with anyone you choose. Alternatively, you can choose to keep some or all files private; to use this option, you don't need to do anything other than create the document, since sharing is something you must activate for each file.


  • Using the navigation bar on the left, you can view the files that people have shared with you, the files that have been starred by you, recent files and more options.

    • The files that you have already uploaded to Google servers can be viewed in the center of the screen. The screen will show you many details, including its owner, its last modification, whether it has been shared with others, and file titles.

    • When you check the box next to files, a menu will pop up allowing you to share, organize, delete, mark as (un)viewed, download, etc., for the selected files. This is where you can add a file to a folder, by clicking on the square box next to the relevant file, then clicking on the folder icon in the menu. A drop-down menu will appear of all your folders, and you can check the relevant folder.

    • Clicking on the star next to a file will quickly allow you to star it––it will turn from clear to yellow. The benefit of stars is that the starred folders can all be viewed at once by clicking on the "Starred" heading in the navigation bar of Google Drive, hiding all unstarred files. This can be very useful if you have a single project holding various documents that you'd like to find quickly and all together.

    • The navigation bar also allows you to see your files by "Activity", which brings the most recently edited files to the top of the list, whether worked on by you or by people you're sharing with.

    • To see all of your files and folders, click on "My Drive". This can be fairly daunting to search through if you have lots though! It's a good idea to place related files into folders as you go, to make searching easier.

      1. 4
        On the right side, there's a horizontal menu bar at the top that will allow you to adjust your Google Drive settings. Many of them are accessible via the button with the wrench icon.

        • You can click "Sort" to change how your files are sorted (by title, last modified, last edited by me, last opened by me, etc.).

        • You can switch between "List" mode--where files are listed by name and information -- and "Grid" mode--where files are organized by thumbnail screenshots.

      2. 5
        You've now walked through the basics of how to use Google Drive. For help and/or more information, you can check out the Google Drive help page at https://support.google.com/drive/.


      Using Google Drive from a computer

      1. 1
        Open Google Drive on your web browser at http://drive.google.com. On the left-hand menu, click on the last link, "Download Google Drive."

      2. 2
        Once you have installed Google Drive for PC or Mac, you will be presented with a short walkthrough of Google Drive's features.

      3. 3
        On the second screen, you have the option to alter your sync settings by clicking on "Advanced Setup."

        • Pay attention to the location of your Google Drive folder. Everything placed in that folder will be synced to your Google account on the cloud, so that they can be accessible on other Drive-supported devices. If you'd like to change the location of this folder, press "Change...".

        • If you only want to sync certain folders to your Google account, select those in the "Sync options" box. You will be able to change these later as you create new folders. Note that files not in a folder will always sync.

      4. 4
        Open your Google Drive folder. You can do this by going to Start >> All Programs >> Google Drive, or finding the location of your Google Drive folder and double-clicking it.

      5. 5
        To upload any file to Google Drive, just copy the file and paste it into the Google Drive folder.

        • Google Drive will automatically sync the file to Google's servers, so you can access that file from any Internet-enabled device logged into your Google account.

        • If there is a tick mark in the icon of the folder or the file that you are uploading, it means that the file has been successfully uploaded. If not, either the file is still getting uploaded or the upload failed.


      Using Google Drive on Android

      Google Drive for Android Operating System (OS) was officially launched on April 24th, 2012. Google Drive for Android replaces Google Docs.

      1. Download the Drive by going to Google Play Store on your Android device.

        • Alternatively, you can go to https://play.google.com and download the same.

        • Google Drive runs on devices which have Android 2.1 or higher.


      2. The main screen of Google Drive provides options for navigating within the service. You will have access to files in your Drive, documents that have been shared with you, files or folders you have starred, recently opened, or edited, as well as files you have downloaded for offline access.


      3. Tap on the account name (on the top of the screen) to switch between Google Accounts and respective Drive accounts.


      4. Create a new item or file by tapping on Menu icon and clicking on 'New'.

        • The first three options in the menu are similar to the ones that were available in Google Docs.

        • The 'Upload' is new to Google Drive and was not available on Google Docs.

      5. Use 'Settings' screen to set the cache size, enable/ disable encryption of offline documents, and various other features.

        • The Cache size can be set from 50MB to 250MB depending on your usage.


      6. Favourite any file or item by clicking on the star to the left side of the title.

        • Starring items will give you easy access to them whenever you use Google Drive.


      7. Click on the small arrow icon on the right-hand side of the title for offline viewing, sharing, sending, renaming, deleting, and opening with another application.


      8. Use the Search feature to search for a particular file, document or folder that you have uploaded or others have shared with you.

      9. You can also use Google drive offline, if you download the Google drive app from the Chrome web store.

    Browser Wars


    Chrome, Firefox, Internet Explorer, Opera, and Safari, all are fast, standards compliant, and feature rich.we compared all five major Web browsers Google Chrome had just over 12 percent of the market. That's now doubled, and it looks like Chrome's market share will pass Firefox's soon.


    Google Chrome 15

    Chrome Instant means your Web page is ready to read before you finish typing the address. This, its speed, minimalist design, and advanced support for HTML5 have deservedly been attracting more and more users to the browser. New hardware acceleration makes Chrome a speed maven at any task.

    Firefox 8

    Firefox 4 got Mozilla back into the game, and the versions keep coming at a much faster clip, now that Mozilla hews to a Chrome-like rapid release schedule. These frequent versions haven't brought the kind of earth-shattering changes we used to see in new full-number Firefox updates, but the development teams have tackled issues of importance to a lot of Web users—startup time, memory use, and of course security. This lean, fast, customizable browser can hold its own against any competitor, and it offers graphics hardware acceleration.

    Internet Explorer 9 (IE9)

    Microsoft's latest browser is faster, trimmer, more compliant with HTML5—a major improvement over its predecessor. It also brings some unique capabilities like tab-pinning and hardware acceleration, but only Windows 7 and Vista users need apply.

    Opera 11.5

    Like the other current browsers Opera is fast, compliant with HTML5, and spare of interface. Long an innovator, recently it's added unique things like Unite, which turns the browser into a server, and Turbo, which speeds up the Web on slow connections through caching. Extension support actually followed other browsers, but Oslo still innovates with tab stacking, visual mouse gestures, and live Speed Dial tiles.

    Safari 5

    Safari is a fast, beautiful browser, but the Reader view and Reading List makes it even more enticing. Leading support for HTML 5 features will also be important, but you can already get that in other browsers, too. Safari's gorgeous styling, strong bookmarking, RSS reader, and vivid new-tab page will also appeal to many.

    How To Protect A PDF With Password


    When sending any sensitive data through e-mail, including PDF files, make sure to password protect or encrypt that information. Although this can be done in Adobe Acrobat, below are steps on how to create a password protected PDF that prompts for a password without having to purchase a program.
    1. Download and install PrimoPDF, a free PDF creator.
    2. Open the document or picture you wish to create password protected PDF for.
    3. Print the file. In the print wizard change the printer name from your printer to "PrimoPDF" and click Ok to start the PDF creation process.
    4. In PrimoPDF as shown in the below picture, select the quality of file, we suggest either "Print" or "Prepress" and then click the Change button for PDF Security.
    5. In the Password Security window check the box for "Require a password to open the document" and enter the password you wish to use and click Ok.
    6. Finally, click the Create PDF button to create the password protected PDF.

    Safe Guard For Your PC From Infected USB Pen Drive Virus Infections


    Data transfer from one PC to another has become very common nowadays. Not only for purposes, rather various multimedia clips, songs, personal data, files and other utilities are also shared among friends or from one personal computer to another. One of the major source through which this data is transferred is through USB drives. There are number requirements. But, along with the data transfer you might have noticed that USB drives also becomes a source for virus to get transferred from one PC to another and in this way corrupts files in both the PC. Autorun viruses are some of the special threats which can come in the PC through the use of infected USB drives. So, in order to prevent your PC and your USB drives from such kind of viruses and malwares, one may use the utility which we are discussing today. official of USB drives available in the market nowadays, which a user can purchase and use on the basis of needs and
    USB Disk Security is basically a small, easy to use, and a freeware tool which has been specially designed for Windows and it allows the user to protect the PC and USB drive against any kind of malicious programs which may be trying to attack either directly or through USB drive in one form or the other. This tool confirms and provides almost 100% protection against any kind of threats which may enter into your computer via USB drive. Not only this, rather this small and smart app provides you with a graphical interface which you may use to scan your USB drives and check if there are any malwares and viruses present in your USB drive. So, we can say that it may prove to be very beneficial for you as it monitors in real time and detects all the threats and malware.
    If you want to try it out or want another step of security for your PC, then you may download it from the link given below and may use the app. You may observe that it runs from the system tray and without disturbing any of your on-going programs and running tools, it simply notifies you of threats, if there are any present in the USB drive. Along with the detection, it also provides you with the set of tools for repairing your PC and this includes other small utilities
    like disk clean up, repairing registry, start up items and safe mode. 


    So, overall we can say that it is really a useful utility in terms of providing an extra layer of security for your system.


    Get Alert, When A USB Is Plugged In While Shutting Down Your Computer


    Sometimes while using the USB drive on your computer or laptop you may forget to remove it before you shutdown your computer.This can lead to a number of issues with your USB drive. You may also forget your USB drive with all your important data at any public place if you are using a computer at a public place. Today I have got an application for you named USB Guard which will notify you before shutting down your system and your USB drive or any external drive is still plugged in.
    The application is very small and simple and does an important task to inform you about the USB drive before shutting down the system.The application doesn’t require any installation which means that you can even run it on the public computer. If you will shut down the computer and you get the notification about the USB drive that is plugged in the computer you can remove the USB drive form the computer using Safety Remove hardware option present in the system tray. After removing the USB drive successfully from the system you can use the power options present in the popup window to take the required action with the computer. The software will always be present in the system tray to monitor your USB drives. The software is designed to work with Windows XP, Windows Vista and Windows 7.
    The USB Guard is an application which after being installed will sit in the system tray. The application will open the above pop up menu on right clicking the USB Guard icon in the system tray. The pop up menu will have options like Monitor the presence of these drives, Autostart with Windows, Check for updates, Check for updates at startup, Donate, Facebook Page, About and Exit. Out of all these options Autostart with Windows and Check for updates at startup are checked by default. The Monitor the presence of these drives option has options like USB Flash Drives, F: [Flash Drive], Hard Drives(i.e External). Autostart with windows option is checked by default due to which the software will launch every time you will start you system automatically. Check for updates options will check for any updates available for the software. Check for updates at startup option will be used in case you want to update your software to automatically check for updates as your system starts .

     The above window will open as the notification window when you will try to shut down your computer with your USB drive still plugged to it. The window has options like Shutdown, Standby, Hibernate and Restart..

    Save A Webpage AS PDF File On Your Computer For Offline Reading


    Many times when we are browsing the internet for some information regarding a topic that we have to sometimes store that information and we may have problems in storing the information by saving the individual webpages. There are a lot of tutorial on various topics available on the internet in the form of webpages and you would like to save these tutorials on your computer or laptop for future references. But you only have the option to save the individual webpages in the form of a HTML page. You must be wondering that it would have been much better if you would be able to convert your webpages into PDF files. But now you can stop wondering and start doing as I have got an application named Joliprint for you.

    This application will not only allow you to convert the webpages into PDF files but it will also allow you to print those files The application is available only for Mozilla’s Firefox browser as an Add-on. With the help of this Firefox Add-on you will be able to easily save and print all the articles that you want online. The Add-on will convert the full webpages into a very good looking PDF file which will include all the things which the webpage has like images, text, author, category, no ads, no navigation menu and only with a single click.

    After you will install the Add-On in your Firefox you will see a small icon on the right side of the toolbar which will look like a printer. When you will click on this icon it will generate an article of the webpage that you have selected. You can pick the articles from any source like webpages, Google Reader, ReadItLater or InstaPaper list and click on the Ad-on button. After the PDF will get generated you will get the option to save it in Google Docs.

    The best feature about this Add-on is that it will remove all the ads from the webpages and convert them into PDF file.These are all the option that you will get once you will click on the Add-on icon. The options which you will get are Download, Save in Google Docs, Share on Facebook, Share on Twitter, Email and Copy the link. The Download option will allow you to download the webpage in the form of PDF file. The Save in Google Docs will save the PDF files directly into the Google Docs. Then you have options to share the PDF on Facebook as well as Twitter. You can also email the PDF using the Email option. Copy the link option allows you to keep the link handy and read or download the PDF whenever you want.
    Download Joliprint

    Full Screen Mode for Turbo c on Windows 7


    Step 1: Open TC++ (normally C:\TC\BIN\TC.EXE). In the startup it will show a dialogue box that it doesn’t support full screen mode as seen in the picture below. Just select ignore option. Then it will open the small screen mode.

    Step 2: Go to the top left of the window and click. It will show a menu as shown in the figure. Then select properties from the menu.

    Step 3: Now it will show the properties window, in which you select the Font tab. There you can see two font options as Raster and Lucida Console. The default will be Raster. You select Lucida Console and select the size from the size list as 28.


    Step 4: After selecting the fonts, now you have to select the layout tab where you can see screen buffer size, window size, and window position options. First unselect the “Let system position window” option from window position options. Now make the following changes:

        * <!–[if !supportLists]–> <!–[endif]–>Screen Buffer Size: Width: 82 Height: 28

        * <!–[if !supportLists]–> <!–[endif]–>Window Size: Width: 80 Height: 26

        * <!–[if !supportLists]–><!–[endif]–>Window Position: Left: -4 Top: -4.

    After making the changes select OK.

    Now you will see a larger window and very crisp font size in which you can work perfectly fine. This technique actually doesn’t provide full screen in windows 7, but you will find it much better.
    NB: The given sizes will work fine for 1280 by 800 screens, but there is no compulsion that you have to use them as specified. You can always use your own options according to your need.

    Get the serial number you need ! (For Certain Things)


    * Go to Google.

    * In the search field type: "Product name" 94FBR

    * Where, "Product Name" is the name of the item you want to find the serial number for.

    * And voila - there you go - the serial number you needed.

    HOW DOES THIS WORK?

    Quite simple really. 94FBR is part of a Office 2000 Pro cd key that is widely distributed as it bypasses the activation requirements of Office 2K Pro. By searching for the product name and 94fbr, you guarantee two things. 1) The pages that are returned are pages dealing specifically with the product you're wanting a serial for. 2) Because 94FBR is part of a serial number, and only part of a serial number, you guarantee that any page being returned is a serial number list page.

    See these example searches:

    "Photoshop 7" 94FBR
    "Age of Mythology" 94FBR
    "Nero Burning Rom 5.5" 94FBR

    Comments

    Enter Your Comments Here...
    Related Posts Plugin for WordPress, Blogger...

    You Are Here...

    Search

    Like Us On Facebook