Ads 468x60px

Lookout Mobile Security


An All-Around Backup, Security & Missing Device Guide


If you own a BlackBerry there’s a good chance you’re familiar with Lookout Mobile Security because, by Lookout’s count, there are 3 million users covering 400 mobile networks in 170 countries using the app. The app offers free antivirus and malware security for apps, contact and photo backup, mapping and alarm tools to locate missing devices, remote data wiping, and an online dashboard manager to oversee it all.

Getting the app is as easy as heading to www.mylookout.com or (m.mylookout.com via mobile
browser) a nd clicking the Download button on the home page. Provide your device’s phone number and Lookout sends you a text message containing a download link. Setup is quick and painless, but once you install Mobile Security, you will need to create an account by providing
an email address and creating a password. From here the Backup tool lets you copy on-device contacts and photos to Lookout’s cloud storage. The data is encrypted before the transfer, and you configure backups to run automatically. The same is true of Security, which scans apps on the phone for viruses, malware, and spyware and can push automatic security
updates to your device. If your phone becomes lost or stolen, the extremely handy Missing Device tool displays your phone’s location in Google Maps. You can also enact a Scream function remotely to sound an especially loud alarm on the phone. And you can use the Wipe feature to remotely erase data on the device if you’re worried about sensitive information falling into the wrong hands. Further, you can configure Lookout to notify you via email when the device is located and keep a history log of the phone’s location.

Galaxy Nexus vs. Droid Bionic vs. Droid RAZR


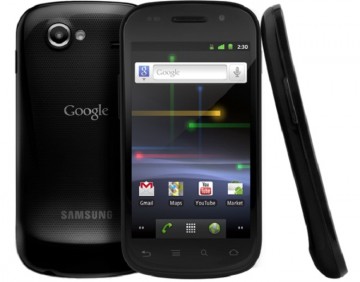
The Samsung Galaxy Nexus is finally available in the U.S. from Verizon Wireless. The Nexus is the first device in the U.S. to run Android 4.0 (Ice Cream Sandwich), the most recent version of Google's Android operating system.

The phone runs on Verizon's 4G LTE network, which just celebrated its first-year anniversary and is now available in 190 markets. Verizon now has a bunch of killer LTE smartphones, so we decided to see how the Galaxy Nexus stacks up against the current leaders, the Motorola Droia Bionic and the Motorola Droid RAZR
 
The Galaxy Nexus features a 4.65-inch HD Super AMOLED display with 1280-by-720 resolution, which blows the competition away, both in terms of size and resolution. But it's powered by a dual-core 1.2-GHz TI OMAP4460 processor, which puts it right in line with the Bionic and the RAZR.
                The Nexus has a 5-megapixel rear-facing camera and 1.3-megapixel front-facing camera for video chat. That's a step down from the 8-megapixel rear-facing cameras on the Bionic and the RAZR—though we were actually a bit disappointed by the Bionic's camera performance in our tests.
                  The Galaxy Nexus includes 1GB of RAM and 32GB of storage, but lacks a microSD card slot. The Bionic and RAZR, on the other hand, both come with 16GB of internal memory, and 16GB microSD cards, expandable to 32GB, so ultimately they can store up to 48GB.


Galaxy Nexus
Droid Bionic
Droid RAZR        

Browser Wars


Chrome, Firefox, Internet Explorer, Opera, and Safari, all are fast, standards compliant, and feature rich.we compared all five major Web browsers Google Chrome had just over 12 percent of the market. That's now doubled, and it looks like Chrome's market share will pass Firefox's soon.


Google Chrome 15

Chrome Instant means your Web page is ready to read before you finish typing the address. This, its speed, minimalist design, and advanced support for HTML5 have deservedly been attracting more and more users to the browser. New hardware acceleration makes Chrome a speed maven at any task.

Firefox 8

Firefox 4 got Mozilla back into the game, and the versions keep coming at a much faster clip, now that Mozilla hews to a Chrome-like rapid release schedule. These frequent versions haven't brought the kind of earth-shattering changes we used to see in new full-number Firefox updates, but the development teams have tackled issues of importance to a lot of Web users—startup time, memory use, and of course security. This lean, fast, customizable browser can hold its own against any competitor, and it offers graphics hardware acceleration.

Internet Explorer 9 (IE9)

Microsoft's latest browser is faster, trimmer, more compliant with HTML5—a major improvement over its predecessor. It also brings some unique capabilities like tab-pinning and hardware acceleration, but only Windows 7 and Vista users need apply.

Opera 11.5

Like the other current browsers Opera is fast, compliant with HTML5, and spare of interface. Long an innovator, recently it's added unique things like Unite, which turns the browser into a server, and Turbo, which speeds up the Web on slow connections through caching. Extension support actually followed other browsers, but Oslo still innovates with tab stacking, visual mouse gestures, and live Speed Dial tiles.

Safari 5

Safari is a fast, beautiful browser, but the Reader view and Reading List makes it even more enticing. Leading support for HTML 5 features will also be important, but you can already get that in other browsers, too. Safari's gorgeous styling, strong bookmarking, RSS reader, and vivid new-tab page will also appeal to many.

Near Field Communication (NFC) Technology


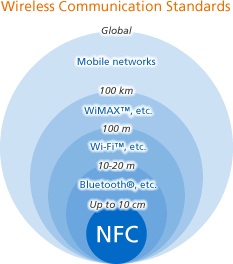
Near Field Communication (NFC) technology makes life easier and more convenient for consumers around the world by making it simpler to make transactions, exchange digital content, and connect electronic devices with a touch.
A standards-based connectivity technology, NFC harmonizes today's diverse contactless technologies, enabling current and future solutions in areas such as:
  • Access control
  • Consumer electronics
  • Healthcare
  • Information collection and exchange
  • Loyalty and coupons
  • Payments
  • Transport
Developers can learn more about NFC in the section on interoperability.

Key Benefits of NFC

NFC provides a range of benefits to consumers and businesses, such as:
  • Intuitive: NFC interactions require no more than a simple touch
  • Versatile: NFC is ideally suited to the broadest range of industries, environments, and uses
  • Open and standards-based: The underlying layers of NFC technology follow universally implemented ISO, ECMA, and ETSI standards
  • Technology-enabling: NFC facilitates fast and simple setup of wireless technologies, such as Bluetooth, Wi-Fi, etc.)
  • Inherently secure: NFC transmissions are short range (from a touch to a few centimeters)
  • Interoperable: NFC works with existing contactless card technologies
  • Security-ready: NFC has built-in capabilities to support secure applications

Watch TV in Windows Media Center


If your computer has the necessary hardware, you can use Windows Media Center to watch live and recorded TV programs on your PC. You can also pause or rewind live TV so you don't miss any of the action.

To find the TV shows that are on now or later, check out the listings in the Guide. The Guide displays information about all TV programs that are available for you to watch or record. You'll need an Internet connection to download the latest Guide information.
To watch TV in Media Center, you need two things:
  • A TV tuner (a device that can be connected to your computer through an internal expansion slot or an external expansion port, such as a USB port)
  • A TV signal source (such as from a TV antenna or a cable TV jack)
If you don't have a TV tuner or don't want to buy one, you can still use Media Center to watch Internet TV (TV shows that are streamed over the Internet rather than broadcast over the airwaves or through a cable or satellite system).
There are two primary ways to control Media Center: with a mouse and keyboard, or with a Media Center remote control. Most of the procedures in this topic refer to the mouse and keyboard method, but the remote control method is often a more satisfactory experience. There are many types of Media Center remote controls available to buy—make sure that the one you want is compatible with your computer.

 To watch live TV using a Media Center remote


  1. To use a Media Center remote to begin watching TV, do one of the following:
    • On the remote, press the LIVE TV button.
    • Press the GUIDE button, locate the TV show that you want to watch, and then press the OK button.
  2. To control playback of live TV, do any of the following:
    • Press the CH + button or the CH - button to go up one channel or down one channel, respectively.
    • Press the ENTER button to quickly go back to the last channel you were watching.
    • Press the FWD button or the SKIP button to move ahead in the program.
    • Press the REW button or the REPLAY button to watch something again.
  3. When you're finished watching live TV, press the STOP button.
    To find movies that are scheduled to be broadcast
    1. Click the Start button .
    2. click All Programs, and then click Windows Media Center.
    3. To find movies that are airing on TV, do one of the following:
      • On the Windows Media Center start screen, scroll to Movies, and then click Movie guide.
      • On the Windows Media Center start screen, scroll to Movies, click Search, choose a search category (such as Movie Director), and then enter your search criteria.


Steps To Rip Music From A CD


Rip music from a CD

You can use Windows Media Player to copy songs from audio CDs to your computer.

 This process is called ripping.During the ripping process, the Player makes a copy of each song, stores it on your hard disk as a Windows Media Audio (WMA), MP3, or WAV file, and then adds it to your Player Library.

After you've ripped your CD collection, you can use the Player to do any of the following:
Find and play any song on your computer with a few quick clicks (no more fumbling with stacks of CDs and CD cases). For more information about finding your music, see Find items in the Windows Media Player Library.

How To Create A System Repair Disc In Windows7


System recovery options can help you repair Windows if a serious error occurs. To use system recovery options, you'll need a Windows installation disc or access to the recovery options provided by your computer manufacturer. If you don't have either of those choices, you can create a system repair disc to access system recovery options.

To create a system repair disc

  1. Open Backup and Restore.
  2. In the left pane, click Create a system repair disc, and then follow the steps.If you are prompted for an administrator password or confirmation, type the password or provide confirmation.

    Note

    • If you're prompted to insert a Windows installation disc, it means that the files needed to create the system repair disc can't be found on your computer. Insert a Windows 7 installation disc.

 To use the system repair disc

  1. Insert the system repair disc into your CD or DVD drive.
  2. Restart your computer using the computer's power button.
  3. If prompted, press any key to start the computer from the system repair disc.
    • If your computer isn't configured to start from a CD or DVD, check the information that came with your computer. You might need to change your computer's BIOS settings.
  4. Choose your language settings, and then click Next.
  5. Select a recovery option, and then click Next.

    Tip

    • Print these instructions and keep them in a safe location with your system repair disc.

How To Set Up A Home-Network Using Hubs,Switches,Routers, and Access points


These are few methods to set-up a  home network.Hubs, switches, routers, and access points are all used to connect computers together on a network, but each of them has different capabilities.

Hubs

Hubs enable computers on a network to communicate. Each computer plugs into the hub with an Ethernet cable, and information sent from one computer to another passes through the hub. A hub can't identify the source or intended destination of the information it receives, so it sends the information to all of the computers connected to it, including the one that sent it. A hub can send or receive information, but it can't do both at the same time. This makes hubs slower than switches. Hubs are the least complex and the least expensive of these devices.

Switches

Switches work the same way as hubs, but they can identify the intended destination of the information that they receive, so they send that information to only the computers that are supposed to receive it. Switches can send and receive information at the same time, so they can send information faster than hubs can. If your home network has four or more computers or you want to use your network for activities that require passing a lot of information between computers (such as playing network games or sharing music), you should probably use a switch instead of a hub. Switches cost a little more than hubs.

Routers

Routers enable computers to communicate and they can pass information between two networks—such as between your home network and the Internet. This capability to direct network traffic is what gives the router its name. Routers can be wired (using Ethernet cables) or wireless. If you just want to connect your computers, hubs and switches work well; however, if you want to give all of your computers access to the Internet using one modem, use a router or a modem with a built-in router. Routers also typically provide built-in security, such as a firewall. Routers are more expensive than hubs and switches.


Network With A Wired Router 


Access points
Access points (also called base stations) provide wireless access to a wired Ethernet network. An access point plugs into a hub, switch, or wired router and sends out wireless signals. This enables computers and devices to connect to a wired network wirelessly. Access points act a lot like cellular phone towers: you can move from one location to another and continue to have wireless access to a network. When you connect to the Internet wirelessly using a public wireless network in an airport, coffee shop, or hotel, you are usually connecting through an access point. If you want to connect your computers wirelessly and you have a router that provides wireless capability, you don't need an access point. Access points don't have built-in technology for sharing Internet connections. To share an Internet connection, you must plug an access point into a router or a modem with a built-in router.


How To Use A USB To Speed Up Your PC


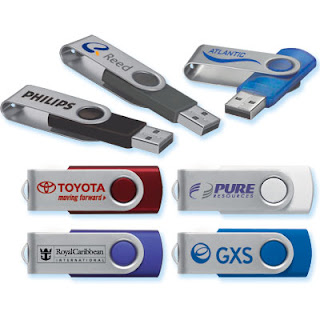
A universal serial bus (USB) flash drive is a small, portable device that plugs into a computer's USB port. Like a hard disk, a USB flash drive stores information, but with a flash drive you can easily transfer that information from one computer to another. USB flash drives vary in size and shape and can hold gigabytes of information. USB flash drives are also called pen drives, key chain drives, key drives, and memory keys.
How To Enable ReadyBoost

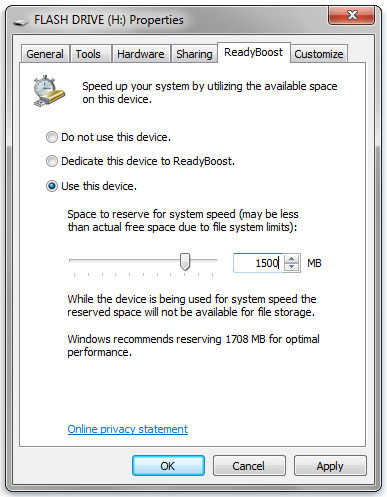
               ReadyBoost can speed up your computer by using storage space on most USB flash drives and flash memory cards. When you plug a ReadyBoost-compatible storage device into your computer, the AutoPlay dialog box offers you the option to speed up your PC using ReadyBoost. If you select this option, you can choose how much memory on the device to use for this purpose.
When you set up a device to work with ReadyBoost, Windows shows you how much space it recommends you allow it to use for optimal performance. For ReadyBoost to effectively speed up your computer, the flash drive or memory card should have at least 1 gigabyte (GB) of available space. If your device does not have enough available space for ReadyBoost, you'll see a message telling you to free some space on the device if you want to use it to speed up your system.
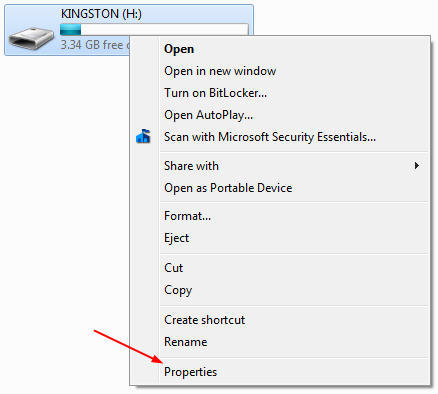
You can enable or disable ReadyBoost for a specific flash drive or other removable storage device.

The ReadyBoost tab lets you decide how much storage space on a removable device to use for boosting your system speed.

How Can I Protect My PC From Viruses


The most common viruses are boot sector infectors. You can help protect yourself against those by write protecting all disks which you do not need write access to. Definitely keep a set of write protected floppy system disks. If you get a virus, it will make things much simpler. And, they are
good for coasters. Only kidding.

Scan all incoming files with a recent copy of a good virus scanner. Using more than one scanner couldbe helpful. You may get those one or two viruses that the other guy happened to miss this month.New viruses come out at the rate of about 8 per day now. NO scanner can keep up with them all, but the four mentioned here do the best job of keeping current. Any  good scanner will detect the majority of common
viruses. No virus scanner will detect all viruses. Right now there are about 5600 known viruses. New ones are written all the time. If you use a scanner for virus detection, you need to make sure you get frequent updates. If you rely on behavior blockers, you should know that such programs can be bypassed easily by a technique known as tunnelling.


You may want to use integrity checkers as well as scanners. Keep in mind that while these can supply added protection, they are not foolproof. You may want to use a particular kind of scanner, called resident scanners. Those are programs which stay resident in the computer memory and constantly monitor program execution (and sometimes even access to thefiles containing programs).
                 If you try to execute a program, the resident scanner receives control and scans it first for known viruses. Only if no such viruses are found, the program is allowed to execute. Most virus scanners will not protect you against many kinds of trojans, any sort of logic bombs, or worms. Theoretically, they could protect you gainst logic bombs and/or worms, by addition of scanning strings; however,this is rarely done.

The best, actually only way, to protect yourself is to :

  • Know what you have on your system and make sure what you have there is authorized by you. 
  • Make frequent backups of all important files. 
  • Keep your DOS system files write protected. 
  • Write protect all disks that you do not need to write to.
  • If you do get a virus, don't panic. Call the support department of the company who supplies your anti-virus product if you aren't sure of what you are doing. If the company you got your anti-virus software from does not have a good technical support department, change companies.
  • The best way to make sure viruses are not spread is not to spread them.
>>>>Some people do this intentionally. We discourage this. Viruses aren't cooool.


Speed Up Your Network and Internet Access In Windows XP

I have a dial up connection and it improve my speeds about 25% in surfing the internet. give it a try.You only do it if you feel comfortable with changing registry.

 Increasing network browsing speed
                 Does your computer slow down when you browse your local area network and connect to other computers that are sharing data? One of the most common causes of this slowdown is a feature of Windows Explorer that looks for scheduled tasks on remote computers. This effort can take some time on some computers and can really slow down your browsing. The window with which you are browsing the network may appear to freeze momentarily, as the system is waiting for a response from the remote computer.

Windows XP: Speeding Disk Access

Although this problem is a complex one, the solution is very simple. Instead of having to wait for the remote scheduled tasks, which is useless information to anyone who is not a system administrator remotely configuring scheduled tasks, you can disable this feature.

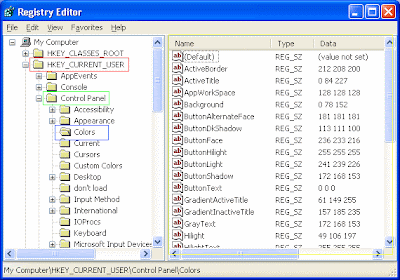
In order to do this, you will have to change the System Registry and delete a reference to a key so that this feature will not be loaded. To do this, follow these steps:

1. Open up the Registry Editor by clicking the Start Menu and selecting Run. Then type regedit in the text box and click the OK button.

2. Once the Registry Editor has loaded, expand the HKEY_LOCAL_MACHINE key.

3. Next, expand Software and then Microsoft.

4. Locate Windows and expand that as well.

5. You will want to be editing the main system files, so expand CurrentVersion.

6. Because this feature is a feature of the Windows component known as Explorer, expand the Explorer key.

7. Next, you will want to modify the remote computer settings, so expand the RemoteComputer key and then expand the NameSpace key to show all of the features that are enabled when you browse to a remote computer.

8. In the NameSpace folder you will find two entries. One is "{2227A280-3AEA-1069-A2DE-08002B30309D}" which tells Explorer to show printers shared on the remote machine. The other, "{D6277990-4C6A-11CF-8D87-00AA0060F5BF}," tells Explorer to show remote scheduled tasks. This is the one that you should delete. This can be done by right-clicking the name of the key and selecting Delete.

Tip:
If you have no use for viewing remote shared printers and are really only interested in shared files, consider deleting the printers key, "{2227A280-3AEA-1069-A2DE-08002B30309D}", as well. This will also boost your browsing speed.

Once you have deleted the key, you just need to restart and the changes will be in effect. Now your network computer browsing will be without needless delays.

23 Ultimate Ways To Speed Up Windows OS


1.) To decrease a system's boot time and increase system performance, use the money you save by not buying defragmentation software -- the built-in Windows defragmenter works just fine -- and instead equip the computer with an Ultra-133 or Serial ATA hard drive with 8-MB cache buffer.

2.) If a PC has less than 512 MB of RAM, add more memory. This is a relatively inexpensive and easy upgrade that can dramatically improve system performance.

3.) Ensure that Windows XP is utilizing the NTFS file system. If you're not sure, here's how to check: First, double-click the My Computer icon, right-click on the C: Drive, then select Properties. Next, examine the File System type; if it says FAT32, then back-up any important data. Next, click Start, click Run, type CMD, and then click OK. At the prompt, type CONVERT C: /FS:NTFS and press the Enter key. This process may take a while; it's important that the computer be uninterrupted and virus-free. The file system used by the bootable drive will be either FAT32 or NTFS. I highly recommend NTFS for its superior security, reliability, and efficiency with larger disk drives.

4.) Disable file indexing. The indexing service extracts information from documents and other files on the hard drive and creates a "searchable keyword index." As you can imagine, this process can be quite taxing on any system.

The idea is that the user can search for a word, phrase, or property inside a document, should they have hundreds or thousands of documents and not know the file name of the document they want. Windows XP's built-in search functionality can still perform these kinds of searches without the Indexing service. It just takes longer. The OS has to open each file at the time of the request to help find what the user is looking for.

Most people never need this feature of search. Those who do are typically in a large corporate environment where thousands of documents are located on at least one server. But if you're a typical system builder, most of your clients are small and medium businesses. And if your clients have no need for this search feature, I recommend disabling it.

Here's how: First, double-click the My Computer icon. Next, right-click on the C: Drive, then select Properties. Uncheck "Allow Indexing Service to index this disk for fast file searching." Next, apply changes to "C: subfolders and files," and click OK. If a warning or error message appears (such as "Access is denied"), click the Ignore All button.

5.) Update the PC's video and motherboard chipset drivers. Also, update and configure the BIOS. For more information on how to configure your BIOS properly, see this article on my site.

6.) Empty the Windows Prefetch folder every three months or so. Windows XP can "prefetch" portions of data and applications that are used frequently. This makes processes appear to load faster when called upon by the user. That's fine. But over time, the prefetch folder may become overloaded with references to files and applications no longer in use. When that happens, Windows XP is wasting time, and slowing system performance, by pre-loading them. Nothing critical is in this folder, and the entire contents are safe to delete.

7.) Once a month, run a disk cleanup. Here's how: Double-click the My Computer icon. Then right-click on the C: drive and select Properties. Click the Disk Cleanup button -- it's just to the right of the Capacity pie graph -- and delete all temporary files.

8.) In your Device Manager, double-click on the IDE ATA/ATAPI Controllers device, and ensure that DMA is enabled for each drive you have connected to the Primary and Secondary controller. Do this by double-clicking on Primary IDE Channel. Then click the Advanced Settings tab. Ensure the Transfer Mode is set to "DMA if available" for both Device 0 and Device 1. Then repeat this process with the Secondary IDE Channel.

9.) Upgrade the cabling. As hard-drive technology improves, the cabling requirements to achieve these performance boosts have become more stringent. Be sure to use 80-wire Ultra-133 cables on all of your IDE devices with the connectors properly assigned to the matching Master/Slave/Motherboard sockets. A single device must be at the end of the cable; connecting a single drive to the middle connector on a ribbon cable will cause signaling problems. With Ultra DMA hard drives, these signaling problems will prevent the drive from performing at its maximum potential. Also, because these cables inherently support "cable select," the location of each drive on the cable is important. For these reasons, the cable is designed so drive positioning is explicitly clear.

10.) Remove all spyware from the computer. Use free programs such as AdAware by Lavasoft or SpyBot Search & Destroy. Once these programs are installed, be sure to check for and download any updates before starting your search. Anything either program finds can be safely removed. Any free software that requires spyware to run will no longer function once the spyware portion has been removed; if your customer really wants the program even though it contains spyware, simply reinstall it. For more information on removing Spyware visit this Web Pro News page.

11.) Remove any unnecessary programs and/or items from Windows Startup routine using the MSCONFIG utility. Here's how: First, click Start, click Run, type MSCONFIG, and click OK. Click the StartUp tab, then uncheck any items you don't want to start when Windows starts. Unsure what some items are? Visit the WinTasks Process Library. It contains known system processes, applications, as well as spyware references and explanations. Or quickly identify them by searching for the filenames using Google or another Web search engine.

12.) Remove any unnecessary or unused programs from the Add/Remove Programs section of the Control Panel.

13.) Turn off any and all unnecessary animations, and disable active desktop. In fact, for optimal performance, turn off all animations. Windows XP offers many different settings in this area. Here's how to do it: First click on the System icon in the Control Panel. Next, click on the Advanced tab. Select the Settings button located under Performance. Feel free to play around with the options offered here, as nothing you can change will alter the reliability of the computer -- only its responsiveness.

14.) If your customer is an advanced user who is comfortable editing their registry, try some of the performance registry tweaks offered at Tweak XP.

15.) Visit Microsoft's Windows update site regularly, and download all updates labeled Critical. Download any optional updates at your discretion.

16.) Update the customer's anti-virus software on a weekly, even daily, basis. Make sure they have only one anti-virus software package installed. Mixing anti-virus software is a sure way to spell disaster for performance and reliability.

17.) Make sure the customer has fewer than 500 type fonts installed on their computer. The more fonts they have, the slower the system will become. While Windows XP handles fonts much more efficiently than did the previous versions of Windows, too many fonts -- that is, anything over 500 -- will noticeably tax the system.

18.) Do not partition the hard drive. Windows XP's NTFS file system runs more efficiently on one large partition. The data is no safer on a separate partition, and a reformat is never necessary to reinstall an operating system. The same excuses people offer for using partitions apply to using a folder instead. For example, instead of putting all your data on the D: drive, put it in a folder called "D drive." You'll achieve the same organizational benefits that a separate partition offers, but without the degradation in system performance. Also, your free space won't be limited by the size of the partition; instead, it will be limited by the size of the entire hard drive. This means you won't need to resize any partitions, ever. That task can be time-consuming and also can result in lost data.

19.) Check the system's RAM to ensure it is operating properly. I recommend using a free program called MemTest86. The download will make a bootable CD or diskette (your choice), which will run 10 extensive tests on the PC's memory automatically after you boot to the disk you created. Allow all tests to run until at least three passes of the 10 tests are completed. If the program encounters any errors, turn off and unplug the computer, remove a stick of memory (assuming you have more than one), and run the test again. Remember, bad memory cannot be repaired, but only replaced.

20.) If the PC has a CD or DVD recorder, check the drive manufacturer's Web site for updated firmware. In some cases you'll be able to upgrade the recorder to a faster speed. Best of all, it's free.

21.) Disable unnecessary services. Windows XP loads a lot of services that your customer most likely does not need. To determine which services you can disable for your client, visit the Black Viper site for Windows XP configurations.

22.) If you're sick of a single Windows Explorer window crashing and then taking the rest of your OS down with it, then follow this tip: open My Computer, click on Tools, then Folder Options. Now click on the View tab. Scroll down to "Launch folder windows in a separate process," and enable this option. You'll have to reboot your machine for this option to take effect.

23.) At least once a year, open the computer's cases and blow out all the dust and debris. While you're in there, check that all the fans are turning properly. Also inspect the motherboard capacitors for bulging or leaks. For more information on this leaking-capacitor phenomena, you can read numerous articles on my site.


Following any of these suggestions should result in noticeable improvements to the performance and reliability of your customers' computers. If you still want to defrag a disk, remember that the main benefit will be to make your data more retrievable in the event of a crashed drive.

10 Fast and Free Security Enhancements

Before you spend a dime on security, there are many precautions you can take that will protect you against the most common threats.

1. Check Windows Update and Office Update regularly (_http://office.microsoft.com/productupdates); have your Office CD ready. Windows Me, 2000, and XP users can configure automatic updates. Click on the Automatic Updates tab in the System control panel and choose the appropriate options.

2. Install a personal firewall. Both SyGate (www.sygate.com) and ZoneAlarm (www.zonelabs.com) offer free versions.
 
3. Install a free spyware blocker. Our Editors' Choice ("Spyware," April 22) was SpyBot Search & Destroy (http://security.kolla.de). SpyBot is also paranoid and ruthless in hunting out tracking cookies.

4. Block pop-up spam messages in Windows NT, 2000, or XP by disabling the Windows Messenger service (this is unrelated to the instant messaging program). Open Control Panel | Administrative Tools | Services and you'll see Messenger. Right-click and go to Properties. Set Start-up Type to Disabled and press the Stop button. Bye-bye, spam pop-ups! Any good firewall will also stop them.

5. Use strong passwords and change them periodically. Passwords should have at least seven characters; use letters and numbers and have at least one symbol. A decent example would be f8izKro@l. This will make it much harder for anyone to gain access to your accounts.

6. If you're using Outlook or Outlook Express, use the current version or one with the Outlook Security Update installed. The update and current versions patch numerous vulnerabilities.

7. Buy antivirus software and keep it up to date. If you're not willing to pay, try Grisoft AVG Free Edition (Grisoft Inc., w*w.grisoft.com). And doublecheck your AV with the free, online-only scanners available at w*w.pandasoftware.com/activescan and _http://housecall.trendmicro.com.

8. If you have a wireless network, turn on the security features: Use MAC filtering, turn off SSID broadcast, and even use WEP with the biggest key you can get. For more, check out our wireless section or see the expanded coverage in Your Unwired World in our next issue.

9. Join a respectable e-mail security list, such as the one found at our own Security Supersite at http://security.ziffdavis.com, so that you learn about emerging threats quickly and can take proper precautions.

10. Be skeptical of things on the Internet. Don't assume that e-mail "From:" a particular person is actually from that person until you have further reason to believe it's that person. Don't assume that an attachment is what it says it is. Don't give out your password to anyone, even if that person claims to be from "support."

How To Connect Your PC In A Wi-Fi Network

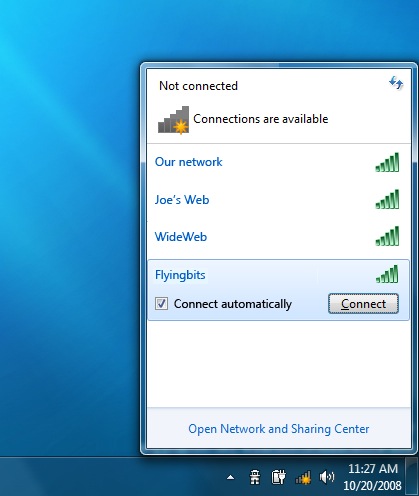
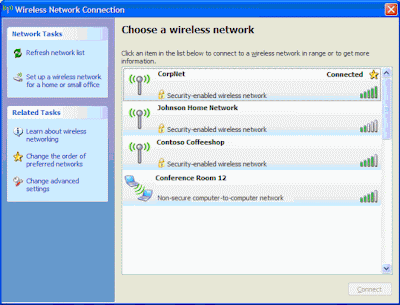
To connect to a wireless network, rightclick the network icon and select View Available Wireless Networks (WinXP) or Connect To A Network (Vista). In Win7, select the Network icon. A menu will pop up displaying available networks. Each OS will identify whether networks are secure. If the network you want is open, select it and click Connect. We advisenot connecting to an open network unless you know it is the one you seek.

Hackers set up open networks with friendly sounding names hoping that unsuspecting individuals will hop onto them. If you are connecting to a secure network, or if you don’t know the name of
the network you want, contact the network host. You’ll need the network name (also called an SSID) and, if the network is secure, a security key or passphrase. Select the desired network and provide the key if prompted. (See “How To Evaluate Security” before you complete this step.) 
If you use WinXP, your network card may manage network connections, leaving you unable to connect using our instructions. To give Windows control, click Start, select Control Panel, lick Network And Internet Connections, and select Network Connections. Right-click your wireless connection and click Properties. Click the Network Settings tab and select the Use Windows To Configure My Wireless Network
Settings checkbox.

How To Set Up A Manual Connection
If you cannot locate the network you want (some networks choose not to broadcast their SSIDs), you can set it up manually. In addition to the network, name, and credentials, you will need the network security protocol and encryption type (TKIP or AES).
To set up a manual connection in WinXP, open the available networks list as described previously and click Advanced or Change Advanced Settings (depending on the service pack you have installed). On the Wireless Networks tab, click Add. In Vista/Win7, open the Network And Sharing Center. In Vista, click Set Up A Connection Or Network at the top left of the display; in Win7, click Set Up A New Connection Or Network (under Change Your Network Settings). Select Manually Connect To A Wireless Network and click Next. Provide the information exactly as you were given it (uppercase and lowercase). In Vista/


▲ In Vista/Win7 the Network And Sharing Center is your portal to setting up new connections, changing network profiles, and more. PC


<<Win7, you can opt to see the characters as you type for confirmation. If the network is WEP and you do not see this option, select Shared. Select an encryption type if you have one. Otherwise, keep the default. After entering all this information configuring the desired settings, click OK or Next to connect.

Things To Remember Before Connecting In Wi-Fi

How To Protect Yourself


The ugly fact is that someone with enough skills and determination can hack into any network, and all but the most secure, private connections can be hacked by someone of average skill and enough determination. Consequently, the most important thing you can do to use Wi-Fi hot-spots wisely is to lock down your data and system.

                            We urge you not to surf without a firewall.If you do not have firewall software installed, turn on Windows’ built-in firewall protection.Because many users have third-party firewall software, we won’t detail these instructions here. You can locate available firewall programs by browsing to windows.microsoft.com and searching under Firewall (your version of Windows).
The next step is to secure your data. Windows Vista/7 give you the option of selecting a network profile (Home, Work, or Public) when you connect. Always select Public unless you trust the network and its members.Doing this prevents other computers on the network from discovering your PC and urns off the File And Printer Sharing feature.You can tweak any of these settings in the Network And Sharing Center: right-click the network icon (a monitor or series of bars, potentially with a red X or starburst on top) at the bottom right of your display. Select Network And Sharing Center in Vista; Open Network And Sharing Center in Win7.

 In WinXP, File And Printer Sharing is turned off by default unless you enable it. To see if it is enabled, right-click the network (monitor) icon at the bottom right of your display and select Open Network Connections. Right-click the icon for your wireless device and click Properties. Under the General tab, deselect the File And Printer Sharing For Microsoft Networks checkbox to turn sharing off globally. When you return to a safe environment, you can re-enable this feature when necessary. In Vista/Win 7, you can also turn off the File And Printer Sharing feature manually through the network connection properties in Vista/Win7, but it’s easier to let Windows do it for you.

Steps To Change Your Computer Name

If you’ve ever bought a new computer with the operating system already installed, you might be annoyed by the default name of the computer when you start trying to connect different computers together. I like to use more descriptive names than HP382811UX… for example, I called my new desktop SUPERFAST and my old computer SOSLOW. Changing this in XP was extremely simple, but in Windows 7 or Vista it’s buried behind a few more menus.
Here are three routes you can take to open up System Properties:
  • Type sysdm.cpl into the start menu search box (quickest)
  • Right-click on the Computer option on the start menu.
  • Open Control Panel, and go to System and Maintenance, and then System.
If you chose one of the last two options, then you’ll need to click on Advanced System Settings on the left menu:
 Now you’ll finally be on the right screen, which should say System Properties.
 Click on the “Change” button to rename the computer, which will pop up this dialog:
Now you can finally change the name of the computer. You could also change the name of the workgroup to something more descriptive as well. You’ll have to reboot after you make this change.

Personalize Your Google Homepage for Convenience

It’s easy to make your Google Homepage (now called iGoogle) a virtual desktop. Rather than
showing a simple window used to access Google Searches, check out the hundreds of neat little plugins,
add-ins, widgets, and gadgets that you can use to enhance your work day or just amuse yourself.
The Google interface starts out in its default classic form, shown in the following illustration.


Now look at the personalized iGoogle page.It’s clear that the intent of the site remains focused around search, although there are additional features to allow access to Google Account programs and information. You can even choose a theme for the page, which changes according to your local time.

 Choose a Theme
The classic Google home page is functional, but if you want to perk it up visually you can apply a theme. Follow these steps:
 
1. Sign into your Google Account.
2. Click iGoogle at the top-right corner of the page to open a version of your home page for customizing.
3. Click Select Theme to display the panel on the iGoogle page 
4. Click an option from the list to display the theme on your iGoogle page.
5. When you’ve chosen a theme, click Save to close the list.
6. Read the Enter Location message that displays next. The message explains how the theme dynamically changes according to the time of day. Your location is shown, as well as a Change link. Click it to choose another location instead.
7. Click OK to close the Enter Location message and return to the iGoogle page, complete
     with new theme.

Locate Content to Customize the Homepage
To add content to your home page, follow these steps:
1. Click iGoogle at the top-right corner of the page to open a version of your search page for customizing.
2. Click Add Stuff to open the Homepage Content Directory where you can find modules and gadgets to add to your homepage

Top 10Steps To Make Your Laptop Battery Last Long


 With the latest laptops, working on the move has never been easier, but laptops are still slaves to the National Grid. While laptop battery life is a chief cause of mobile moans, it's possible to get significant improvements by good practice and a few software tweaks. To help you get a longer laptop battery life, here are 10 easy ways to improve it. 


1. Dim your screen
The screen is one of the most power-hungry parts of the laptop. It takes serious amounts of battery power to keep your display looking clear and bright. Saving this power is simply a question of turning the brightness down.
2. Change power settings 
Windows comes with some great power features, which enable you to eke out the best performance when you're plugged into the mains, and optimise battery life when on the move. Type power options into the Start Search box and choose Power saver from the list. The Windows Mobility Center has more methods for saving battery life. These include settings for powering off the monitor and kicking into sleep mode more quickly.  
3. Switch off Wi-Fi 
One of the biggest battery sappers is the wireless networking capabilities built into most laptops. Wi-Fi drains the battery by constantly drawing power from the battery and, when not connected, looking for networks.When you're using your laptop away from the grid, the likelihood is you're away from wireless networks, so you can turn this device off.
4. Turn off peripherals 
Using USB peripherals can put a big drain on your system, because your motherboard has to power them, so unplugging everything saves juice. USB sticks, mice and webcams are common offenders, so copy all your information across and eject your devices as soon as possible, and put up with laptop track pads over your USB mouse
5. Eject your disc drives
Having a disc spinning in the drive is a huge drain on resources, and many programs constantly do this. Simply eject your discs before you switch to battery power to gain vital extra minutes from your working day. 
6. Invest in some hardware
Good practice can go some way to extending your battery life, but if you need to use your laptop throughout your working day, you're going to need some help. Most laptops come with a six-cell battery, but many manufacturers offer eight- or even 12-cell optional upgrades, which can double your power. The alternative to expensive laptop batteries are products such as the Philips Portable Power Pack, which gives you valuable extra hours for all your devices.
7. Disable features
Windows has some handy built-in features, but many put demands on your system that are unnecessary when working on the move. Take the simple measure of turning off Windows Aero when you're on the move to make your laptop more efficient.
8. Battery care
Lithium-Ion batteries don't need a complete discharge (contrary to popular belief) but also you should use a battery once you've charged it. If you have a spare you keep topped up, use that instead of your main regularly. If you have an older non-Lithium-Ion battery, you'll need to regularly discharge it.
9. Get more memory
Give your laptop a break. If you're using intensive apps that usually require a lot of virtual memory, you'd be better off buying more RAM (though it's worth noting that more memory will need more power). Virtual memory isn't too efficient when it comes to battery life; it spins your hard disk more.
10. Don't install apps from disc on the move
Try to reduce the time you use optical drives to a minimum; they can be pretty power hungry and installing apps from CD or DVD can have an instant effect on your battery life indicator.

Restore Accidently Deleted Files In Memory Devices

Sometimes we will accidentally deleted a photo on your camera, computer, USB drive, or anywhere else? What you might not know is that you can usually restore those pictures—even from your camera’s memory stick.

Windows tries to prevent you from making a big mistake by providing the Recycle Bin, where deleted files hang around for a while,but unfortunately it doesn’t work for external USB drives, USB flash drives, memory sticks, or mapped drives. Luckily there’s another way to recover deleted files.

Restore that File or Photo using Recuva

The first piece of software that you’ll want to try is called Recuva, and it’s extremely easy to use—just make sure when you are installing it, that you don’t accidentally install that stupid Yahoo! toolbar that nobody wants. 

Now that you’ve installed the software, and avoided an awful toolbar installation, launch the Recuva wizard and let’s start through the process of recovering those pictures you shouldn’t have deleted. 

The first step on the wizard page will let you tell Recuva to only search for a specific type of file, which can save a lot of time while searching, and make it easier to find what you are looking for.  

Next you’ll need to specify where the file was, which will obviously be up to wherever you deleted it from. Since I deleted mine from my camera’s SD card, that’s where I’m looking for it.
The next page will ask you whether you want to do a Deep Scan. My recommendation is to not select this for the first scan, because usually the quick scan can find it. You can always go back and run a deep scan a second time. 
 And now, you’ll see all of the pictures deleted from your drive, memory stick, SD card, or wherever you searched. Looks like what happened in Vegas didn’t stay in Vegas after all… 
If there are a really large number of results, and you know exactly when the file was created or modified, you can switch to the advanced view, where you can sort by the last modified time. This can help speed up the process quite a bit, so you don’t have to look through quite as many files. 
At this point, you can right-click on any filename, and choose to Recover it, and then save the files elsewhere on your drive. Awesome!

Download Recuva from piriform.com

Comments

Enter Your Comments Here...

Related Posts Plugin for WordPress, Blogger...

You Are Here...

Search

Like Us On Facebook